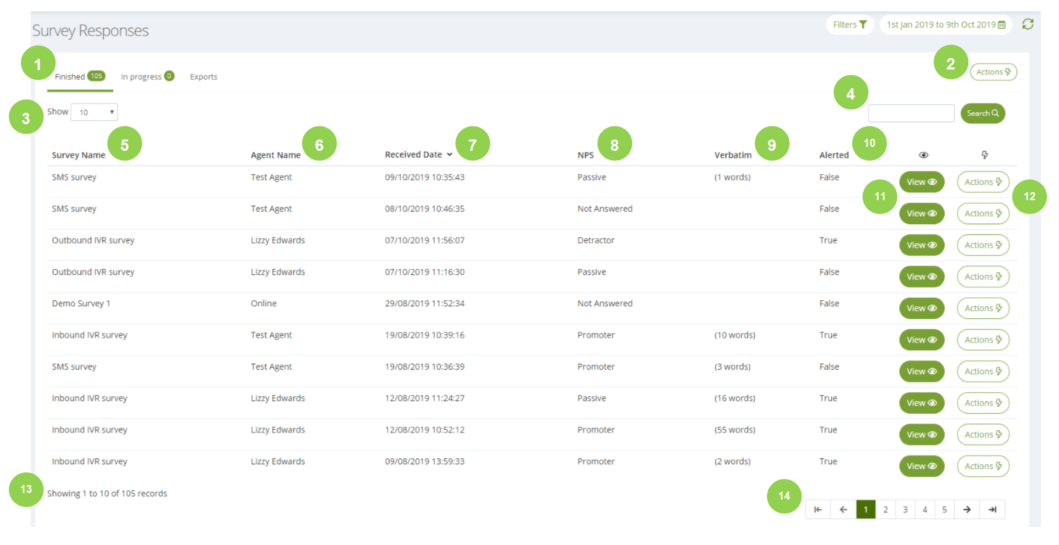
What is the Response List?
The response list shows you the individual survey responses that your customers have given to your surveys. Like any page in the console, you can use filters and date range settings to refine your search and return only the responses that you are looking for.
How do you access the Response List?
The Response List can be accessed from anywhere in the console, by clicking or hovering on ‘Responses’ in the side menu, and then choosing ‘Response List’ in the sub-options.
Response List explained:

1. Tab functions
Use these tabs to switch between finished responses, ones that are still in progress and the Exports functionality.
2. ‘Actions’ menu button
Use this menu to print the list of responses.
3. ‘Show’ button
Use this dropdown to select how many responses you would like to view per page: 10, 50 or 100.
4. Search bar
This can be used to search the Response List for certain responses. This is a handy way to narrow down responses using criteria that aren’t filters. For instance, in the example above, we could search for all responses that were classified in the ‘NPS’ column as ‘Passive’.
5. Survey Name
This column details which survey the response is for.
6. Team Member Name / Detail
This column details the team member that an IVR response relates to, or the email address of the customer who has responded to an online survey.
7. Received
This column details the date and time the response was received.
8. Customisable columns
We can customise which additional columns are shown on this page based on your survey and account setup. In our example above, we are detailing if each respondent was a detractor, passive or promoter based on the score they gave for the NPS question within the survey.
9. Verbatim
This column details if a response contains a verbatim and how many words it is.
10. Alert
This column details if the response triggered an alert (based on pre-determined criteria).
11. ‘View’ button
Use this button to look at a response in more detail. Clicking on this button displays several different options for viewing data relating to the response, as seen below:
You can view all information or filter down to just the part you need: Answers, Details, Alerts, Survey Notes, Custom Data, and the Audit Trail. Check out the article relating to viewing responses for more information on each of these data types.
12. ‘Actions’ button
This button displays the actions you can undertake for Responses. From this menu, you can edit or delete a response (granted you have the correct permissions to do so), add a note to a response or action an alert.
13. Response count
This shows how many responses match your current date range selection and any filters you have applied.
14. Navigation buttons
Use these buttons to navigate the Response List pages.
Clicking the inner arrows will take you one page onwards or one page back, whilst clicking the outer arrows will take you to the first or last page. The number in the middle indicates the page you are currently on.
Ready to put this into practice?
Comments
0 comments
Please sign in to leave a comment.